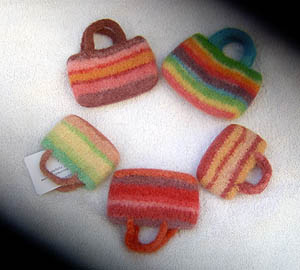
Monika has graciously written up a tutorial on space-dyeing yarn for planned stripe sequences. Check out the little felted purses she made with this technique!
Step 1--Preparing the yarn
Figure out the size of the purse or other object you want to knit with your space dyed yarn. Figure out how much yarn one row takes by knitting one row with the undyed yarn and ripping it out. (If you want to felt the purse, you need to add 30 – 50% for shrinkage, i.e. if you want a 7” x 4” purse, you should knit it at least 10“ X 5˝”. Felting is not an exact science, results may vary from one time to the next even if the same yarn is used.) Decide on the colors and width of stripes. (This does not have to be super-exact. Sometimes just going at it without a plan gives interesting results.) Wind off the yarn in the desired length. I use the legs of an upside down footstool and tie the hanks off with bread ties.
Example: Green and yellow purse
Stripe sequence 6 rows green, 2 rows yellow, 4 g, 8 y, 2 g, 4 y, 6 g.
Yarn use for one row or round – 40”. If your chair legs are 20” apart, one winding will result in one row. So you will to measure the following hanks (do not cut them apart) wind 6 times, tie off, wind 2 times, tie off, wind 4 times, tie off, etc. Do not tie off the individual hanks too close together - leave about 10” between to move from one dye bath to the next. This will aid in avoiding undyed segments.
I always wind an extra large hank for handles, pocket, etc.
Be careful not to get the hanks tangled.
Step 2--Soaking the yarn
Since many of my projects are done with frogged yarn, I soak in hot water with a squirt of soap added. Using a narrow container, a glass or vase, will help to keep the yarn from tangling. You may omit this step if using “new” yarn, though the yarn absorbs the dye better if it is wet. [Editor's note: I've found that all yarn, new or recycled, absorbs dye better if it's wet.]
Step 3--Finally, the fun stuff! Dyeing
Set up containers with the KA colors you want to use. You will need a larger container with warm water to rinse each hank and a towel to place them on. It helps to have a cookie sheet lined with a towel to keep the hanks from tangling while they dry.
Make sure the containers you use to dye in are heat resistant. Add boiling water to the KA in each container and put in the first hank, adding some of the “loose” yarn between hanks. Wait about 3 minutes before repeating the process with color 2, this time pull the “loose” yarn into color 2 to avoid undyed portions.
Depending on the colors you use, overlapping the two colors can produce a fun transition. Experiment!! After about 5 – 8 minutes in the dyebath, take the hank out and rinse in the other container. Place on towel to dry. Continue until all the yarn is dyed, rinsed and ready to dry.
I have found that it not necessary to either boil or microwave the yarn, if the dyebath is hot enough. Reheat in microwave if necessary.
Congratulations: You now have your created your own space-dyed “Noro-like” yarn. Once you start, you won’t be able to stop!! Starting out with a color other than white, beige, brown or grey, can achieve some lovely colorways.
You can wind the yarn into a ball or work right from the hanks if they are not too large or tangled.